
PEZ readers will know that I’m more than enamored with the Wahoo KICKR BIKE SHIFT. It does everything that riding my bike on a smart trainer (like the the new KICKR CORE 2 or the current iteration of the venerable KICKR) does, but I can hop on and ride anytime I want without the hassle of putting my bike on and taking it off a trainer (I know … first world problem). . But there’s always room for improvement and when Wahoo offered up the opportunity to test the new KICKR BIKE PRO with added features like tilt to simulate physical grade and integrated Zwift controls, I couldn’t say “no.”
KICKR BIKE PRO – $3,999.99


Chuck sez: Needless to say, the WAHOO KICKR BIKE PRO isn’t cheap. But what I said about the KICKR BIKE SHIFT applies to the PRO (I’ll use that shorthand term throughout the rest of the review) too:
Yes, the KICKR BIKE SHIFT is more expensive than a typical smart trainer. But less expensive (and arguably more practical) than a typical n+1 bike. At least that’s one way to rationalize/justify buying it to your spouse/significant other. That’s my story and I’m sticking to it!
Now that we’ve gotten that out of the way …
Assembly
Unlike a typical smart trainer where you take the rear wheel off your bike and connect the chain to the cassette on the smart trainer (for example, the new KICKR CORE 2), the PRO is a complete stand-alone smart bike. So set up is a little more involved and requires the dreaded “some assembly required.” Fortunately, assembly is relatively easy. The hardest part is attaching the legs, which is a two-person job — one person to hold the “frame” and another person to bolt the legs on (two 5 mm hex bolts for each leg).

I didn’t weigh it, but it took two guys to get it off the truck and into my house

IMHO, the boxing of the PRO is better than the SHIFT, which technically takes two people to unbox (although I actually did it by myself)

Everything you need in the box: (1) stem/handlebars, (2) seatpost/saddle, (3) power brick and plug, (4) legs, (5) hex bolts and hex wrenches (because you can never have too many hex wrenches!)

Wahoo also includes pedal washers/spacers, but I didn’t use them

One person needs to tilt and hold the KICKR BIKE PRO in place while the other person slides the leg on and attaches the bolts (on the underside)

Before


The stem/handlebar assembly slides into a tube at the front (and locks in place with a quick release lever)

The handlebar is a “basic” round cross section handlebar with flared drops (about 5 degrees using my iPhone’s Level Bar) and cushy Fi’zi:k handlebar tape. I measured handlebar width at 40 cm at the hoods (probably where most of us will spend our time on indoor rides and 46 cm at the bar ends. Not bars I would ride IRL (in real life), but OK for me for indoor riding. If you’re super-finicky about bars, you could certainly swap them.

 The seat post/saddle assembly slides into a tube at the back

The PRO comes with a Fi’zi:k Aliante Saddle, which is a “wave,” i.e., curved, profile (if your butt and undercarriage prefer a flat saddle, it’s not the ‘droids for you). I’ve ridden various incarnations of the Aliante over the years without any issues, but saddles are a very personal choice so it might not work for you and you’ll have to replace it with a saddle of your choice. NOTE: The version of the Aliante that comes with the PRO has a center channel but not a cutout. The rails are alloy. I measured saddle length at 275 mm (so not a short-nose saddle) and width at 145 mm.

Install pedals to your desired crank arm length

Plug the shifter cords into LED display box at the front. NOTE: You can connect to any two of the available three ports. Also, there’s a USB port to charge a device. e.g., your phone.

Plug the power brick into the dongle at the back

After
To give you a better idea of what’s involved with putting the PRO together, here’s a good video:
After you’ve got the PRO assembled and plugged-in, you’ll need to connect the PRO to your wi-fi network and pair it with the Wahoo app (available in the App Store or on Google Play). You’ll use the app to set up your bike profile. I mimic’d the drivetrain of my Colnago V3 and LOOK 795 Blade RS:
- 12-speed Shimano Di2
- 50/34 chainrings
- 11-34 cassette
You can choose from Shimano, SRAM or Campagnolo; front brake on the left of right; 1, 2, or 3 chainrings and chainring sizes; and 9, 10, 11, 12, or 13 speeds and the cassette range. Here are some screenshots from the app:

Bike fit
Once the PRO is assembled, the next step is to get it fitted by adjusting:
- Standover height
- Saddle height
- Set back
- Reach
- Stack (stem/handlebar height)
- Crank length
The Wahoo app offers two options to help with fit. Click on your bike profile in the app and scroll down to the Start fit wizard:

BASIC FIT is calculated based on your inseam and riding position (interestingly, height isn’t part of the equation)

PROFESSIONAL FIT takes your bike fit measurements from a Guru, Retul, or Trek fitting
NOTE: If you know what you’re doing, it’s also possible to replicate the fit of your real world bike on the PRO by taking lots of different measurements of your bike fit/position, but it can be a little tedious (I did this when I fitted myself to the SHIFT).
I “cheated” and used my fit settings from the SHIFT for the PRO. And then I used the Arch Design Works Dupli-Fit Pro to fine tune my fit to duplicate the fit on my on my Colnago V3 and LOOK 795 Blade RS.
To give you some idea of BASIC FIT (based on 30 inch inseam and Race riding position) compared to my final fit using Dupli-Fit:
| Wahoo app | Dupli-Fit | |
| Standover | A | A |
| Saddle height | 11.7 cm | 11.5 cm |
| Set back | 6.7 cm | 7.5 cm |
| Reach | 1.6 cm | 5.8 cm |
| Stack | 1.3 cm | 1.3 cm |
| Crankarm length | 167.5 mm | 170 mm |
NOTE: I ride 170 mm crankarms so stuck with that rather than the Wahoo app recommendation

Flip the “handle” down and pull the knob out to adjust standover height

Open (left) the “levers” on the “top tube” to make set back and reach adjustments and close (right) to lock in place
 Set back adjustment

Reach adjustment
Riding the KICKR BIKE PRO
Riding the PRO is … well … like riding a bike on a smart trainer … except it’s an all-in-one unit. Compared to a bike on a smart trainer:
- Because it’s belt drive, the PRO drivetrain is very quiet.
- Pedaling engagement with the belt drivetrain is nearly instantaneous. More like a riding a track bike.
- Virtual shifting is nearly instantaneous, which can take a little getting used to. If you thought Di2 was fast, SHIFT is faster. Virtual gear shifts are also silent. And there’s no mechanical feedback.
- The ride feel is excellent and the load changes (up or down) to a prescribed power level or to simulate gradient are smooth.

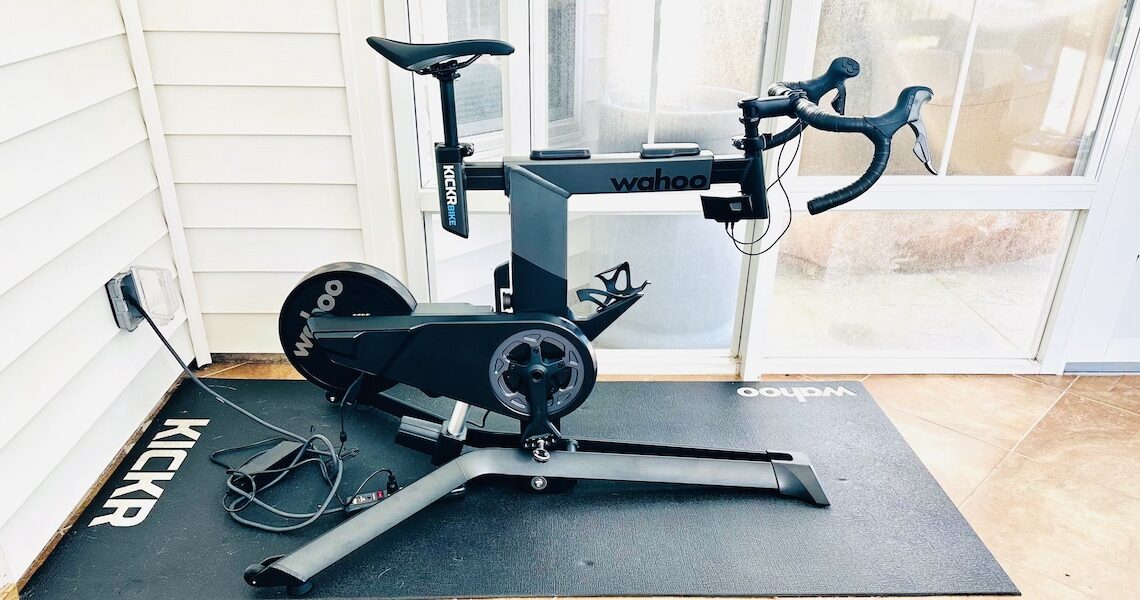
Ready to ride!
Also, the PRO has Wahoo’s ERG Easy Ramp that was first featured on the KICKR v6 that I’ve previously ridden and written about:
Not that any of us would stop while riding up something like Alpe du Zwift, Ventop, Innsbruck KOM, or the dreaded Radio Tower Climb in Zwift, but if you did and then tried to start back up again, you’d be starting under the full resistance power load on the trainer of simulated gravity for the incline. Instead of instant-on, ERG Easy Ramp “eases” you back up to the prescribed power and gives you time (about 10 seconds) to re-build your cadence rather than forcing you to put out all those watts at once (like a deadlift only pedaling). A similar scenario is if you have to stop in the middle of an interval because you forgot your water bottle or to turn your fan on — again, not that any of us would ever do that. In either case, your knees will thank you.
Instead of having to put out xxx watts immediately [e.g., after stopping on an uphill section or in the middle of an interval during a workout session], the ERG Easy Ramp allowed me to more easily and smoothly spin back up to power. This is a welcomed instance where virtual reality doesn’t mimic IRL.

Also the same on the PRO are the buttons on the inside of the brake hoods for moving left or right on virtual simulations that have steering
Some differences moving “up” from the SHIFT to PRO:
- Most notable is the tilt feature to mimic physical gradient (+20% or -15% maximum up or down, respectively). The actual tilt movement is very smooth and fairly instantaneous with the simulation you’re riding, e.g., Zwift. The grade needed to be greater than 5 percent incline for me to notice the change and feel like the bike was tilted up (in contrast, I noticed and could feel almost any downward tilt). But closer to and above 10 percent, I could definitely feel the physical difference between the bike being level and tilted up.
- Built-in display to indicate what gear you’re in (if the simulation you’re riding doesn’t tell you).
- KICKR BRIDGE allows you to connect external sensors, e.g., heart rate, core temperature, to your home network through the PRO to free up channels on devices with limited Bluetooth connections (NOTE: this is not a feature I use).
- Wheels on the rear legs make it relatively easy to tilt the PRO up and move around.
- Built-in Zwift Play controllers on the hoods. Figuring these out were trial-and-error for me. If you’re a hard-core Zwifter and totally into the gamification (I’m not), you’ll probably appreciate these more than me. That said, I liked the Ride On Bomb feature to riders in my near vicinity a Ride On. Click here for Zwift’s guide on how to use their game controllers.


In addition to mimic-ing Zwift’s Play controllers, the buttons on the brake hoods can be used to manually adjust grade. Press the front buttons on both hoods (red arrows) to adjust tilt down and the rear buttons on both hoods (green arrows) to adjust tilt up.

Press the button (arrow) to toggle between locked (to manually control bike tilt) and unlocked (to let software, e.g., Zwift, control tilt). The display indicates (1) locked, (2) what gear you’re in (in manual mode it will also tell you the percent grade when you change incline), (3) unlocked, and (4) if the KICKR BIKE PRO is connected via wi-fi to an external device.

Level

Vuelta-esque 20 percent
 Super tuck minus 15 percent
If there’s anything lacking with the PRO, it would be some side-to-side and fore/aft movement (found in the KICKR MOVE smart trainer) for more realistic road feel and comfort. But — at least for me — this is a very minor niggle and definitely not a deal breaker.

Another minor niggle is having only one waterbottle cage. I keep a short step-stool next to the bike for additional waterbottles.
Otherwise, IMHO the PRO is everything you could want in an indoor riding bike — especially if you want a dedicated set up that’s ready-to-ride whenever you want. And its easy adjustability makes it ideal for multi-rider households — perhaps a selling point to convince your significant other? If you’re a #wahooligan, the PRO is arguably the pinnacle of Wahooliganism.

My #wahooligan set up includes: KICKR Mat, KICKR Indoor Cycling Desk, and KICKR Headwind Fan (and yes, those are Wahoo Speedplay Zero pedals)
It’s not yet winter, but I’ve already racked up a few hundred virtual miles on the KICKR BIKE PRO and can honestly say I’m actually looking forward to more indoor riding (I’ve managed to put in ~1,000 virtual miles over each of the last two winters).

Some sort of sweat guard is highly recommended
Should you buy a KICKR BIKE PRO?
I can’t say definitely and I’m certainly not going to spend your hard earned money.
As I said at the top that the KICKR BIKE PRO isn’t cheap, so that’s obviously a consideration. If you already have a smart trainer and are happy riding on it, it might be hard to justify spending the money on a dedicated smart bike — both from a financial and functional standpoint.
Ditto if you’re already riding the previous generation KICKR BIKE or the KICKR BIKE SHIFT. The new KICKR BIKE PRO is a #marginalgains updgrade.

But if you don’t already have a smart trainer (or are one of those people who just has to have the latest and greatest), have the $$$$ to spend, and a dedicated space for an indoor bike …
- Convenience is the first word that comes to mind. A lot of times, I have a hole in my schedule and it’s both easier and less time consuming to be able to hop on the KICKR BIKE PRO for 45 minutes to an hour on Zwift or Rouvy.
- There’s also the fact that I’m not putting any wear and tear on my IRL bikes. And don’t have to worry about any potential mess caused by riding my IRL bike indoors.
- As I previously mentioned, you can adjust the KICKR BIKE PRO to fit multiple riders so more than one of you can ride it.
- The up and down tilt for gradient, steering controls, and built-in Zwift controllers make for a more immersive virtual indoor riding experience. IMHO, it’s the Mother of all Smart Bikes.
• See everything Wahoo has to offer at their website here – and if you purchase anything from one of our links, PEZ receives a small commission to help keep this site running.
– Thanks for reading!
NOTE: If you have other experiences with gear or something to add, drop us a line. We don’t claim to know everything (we just imply it at times). Give us a pat on the back if you like the reviews or a slap in the head if you feel the need!
PezCycling News and the author ask that you contact the manufacturers before using any products you see here. Only the manufacturer can provide accurate and complete information on proper/safe use, handling, maintenance, and or installation of products as well as any conditional information or product limitations.
The post Review: Wahoo KICKR BIKE PRO … the Mother of All Smart Bikes appeared first on PezCycling News.